Running from the Law: Photography for Moms
Showing posts with label Photography for Moms. Show all posts

Monday, June 23, 2014

Photography for Moms - Self-Taught Lessons

Happy Monday, y'all!  (Ugh.)  Did everyone have a great weekend?  I had one of those weekends where I alternated back and forth from feelings of "oh my gosh, my child is the most amazing/wonderful thing that has ever happened to me" one moment to "why did we ever want to have kids" the next minute.   The terrible twos are seriously no joke. 

Anyway, I'm thrilled to bring you the next installment in the "Photography for Moms" series.  Are you guys still loving this series as much as I am?  I hope so.  I think I have at least 3-4 more guest posters lined up for the summer.  Let me know if there's a topic you'd like us to cover.  

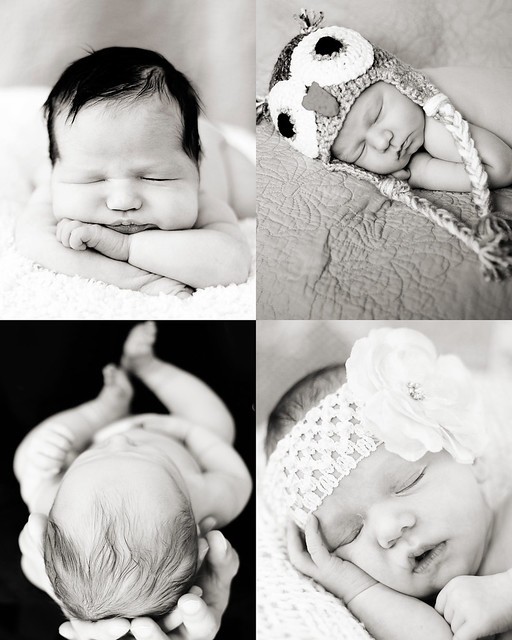
Today's guest poster is Colleen from the awesome blog, Meet the Sullivans.  Colleen has a son (Owen) a little bit older than Mac and I've been following her blog since her pregnancy days.  I really love Colleen's blog, probably because it's what I want my blog to be: a mix of adventures with your kids, recipes, crafts/projects and personal stories, accompanied by beautiful photos and a clean, crisp layout.  Her blog makes me happy.  And what I really admire about Colleen is that all her "photography skills" are self-taught.  She's done an amazing job over the last couple years coming into her own in the photography department - I love the photos she takes of Owen (she really captures his spirit and spunk) and her food/recipe pictures always make me drool.  I'm so glad she agreed to be a part of this series because I know so many of you will get a lot out of her post.  She's here today sharing some of the tips, tricks and advice that she's learned along the way to make her photos stand out from the crowd.  As always, if you have any questions for Colleen, leave them in the comment section below!  Enjoy!
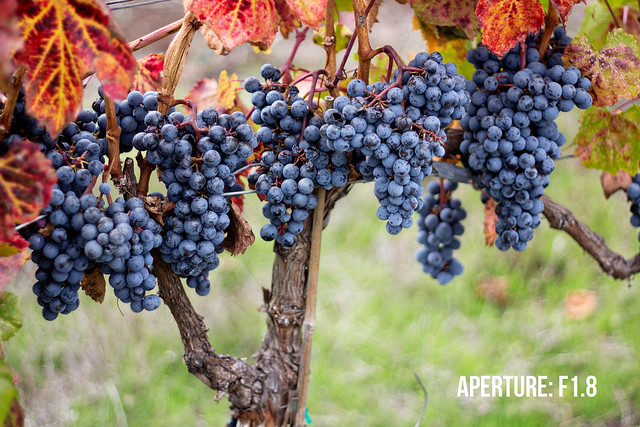


Hello! I'm Colleen and I blog over at Meet the Sullivans. I'm a stay-at-home mom (formerly a Kindergarten teacher) married to my handsome PT husband and mom to our 2 year-old son, Owen. I'm so excited to be here today sharing a bit of what I know about photographing little ones. I don't know a lot, but what I do know is the result of basically teaching myself, and today I want to share with you how I did that and some of the tools I use to make my pictures special.

I really had no idea how to use my dSLR when I first bought it way back in 2008. I had taken a photography class in college, but we spent most of our time learning how to develop film, rather than take pictures. I'm not a professional, I only know what little I do know from reading tutorials I've found on Pinterest (you can see my photography board on Pinterest to see some of my favorites) or from tips from other mommy bloggers (like Erin, Sara and Jenny).

In the beginning I mainly used the auto setting on my camera, which I was pretty happy with... until I started seeing other people's more "professional" looking shots. I knew I was wasting the great camera I had by not learning to use it properly. I would use the auto setting outside or in a low light situation, but depended on the "No Flash" setting as often as I could since I knew flash is a no no and I have never liked the look of pictures I've taken with a flash.

For the first year after buying it I brought my camera out whenever I could to play with. I played with style, the rule of thirds, getting different angles, etc. I didn't know how to mess with Manual settings, so I just left them alone. I was worried I would just have blurry messed up pictures if I tried shooting in Manual and that I would lose the moment I was trying to preserve.

I really began to pick my camera up more once we had Owen, which makes complete sense since that's when I started staying home, so I had more opportunities during the day to break out my camera and mess around. That's an important term here: mess around. That's basically how I learned to use my camera. I just played with it. In different lights, inside or outside, with a mostly stationary object (infant) and an active one (toddler).

When I bought my camera I went home with two lenses a 58mm 75-300 zoom lens and the kit lens I used exclusively until January of this year.

And then this Christmas Keith gave me a 50mm lens f1.8, which is mainly what I use now for about 95% of the pictures I take. It took me a while to get used to not being able to zoom in or out, but the quality of the photos is worth not being able to do that.

While I am not even close to being a professional at this photography thing I do have a few tips I've learned along the way to make my pictures just a little bit better!

Play with your camera as much as possible. Keep it out where you know you'll see it and be drawn to pick it up. I might take 40 photos of Owen doing one thing and only end up using 2-3 on my blog. Most people have to take a lot of pictures before they end up with a great one.

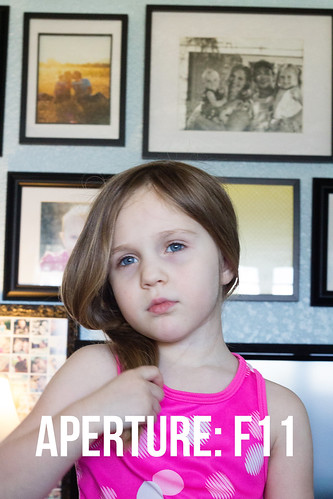
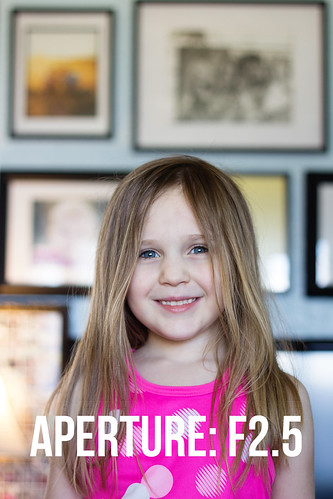
Manual is best, if you know how to use it, so LEARN it. You're not going to learn it in a week. It's a process, and I'm still trying to figure it out. Sometimes I just want to get a few good shots and don't want to bother with my camera too much, so I just switch to one of the preset auto settings like "Sports" or " Av".
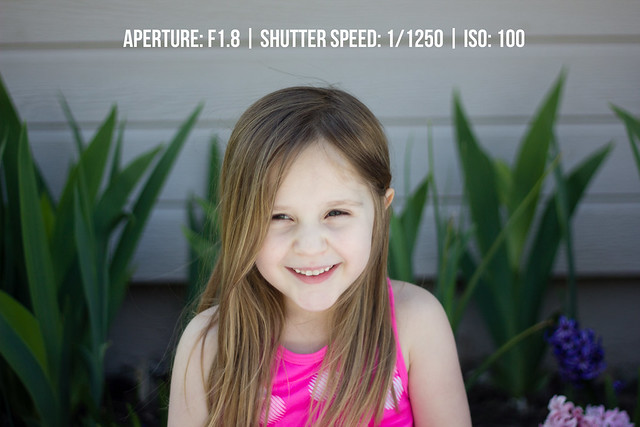
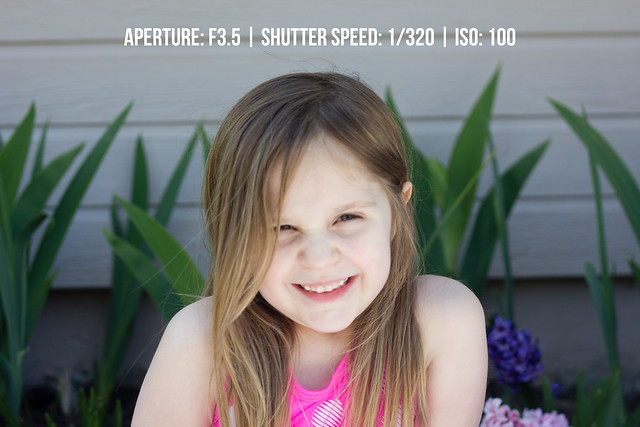
18-55mm ISO 400 f/4 1/500
Get on their level. When Owen is playing on the floor, inside or outside, I like to get down on the floor with him and take pictures from his level. It gives the photo a neat perspective and it really captures the moment and expression on their face as they play.
 
Take lot so of pictures from all different perspectives. I like to get on the floor with Owen and take a few shots on his level, take a few from above and maybe one from far away. Sometimes I focus on his hands as he plays with a toy or just on his face. Each on gives a different feeling. 
 18-55mm ISO 400 f/3.5 1/160
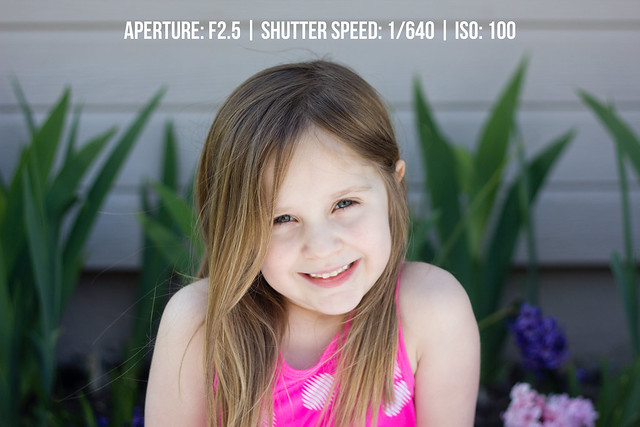
The best light is outside, early in the morning or late in the afternoon, right before the sun goes down. You do not want to shoot in direct sunlight. Shade is best. Shoot in the shade with the sun to your back OR with the light behind you for a cool back lit photo (like the one above). Lighting is king -- there is no coming back from a poorly lit picture. The most you might be able to do is turn it black and white, so know your settings and good light when you see it. I like to take pictures of him outside late in the evening, when the sun is going down, there is more shade and the sun is lower. But if that's not possible I just stick to the shady spots in our front yard, and let the light be behind him as a backdrop.
50mm ISO 100 f/2.5 1/3,200    |    50mm ISO 400 f/3.5 1/500
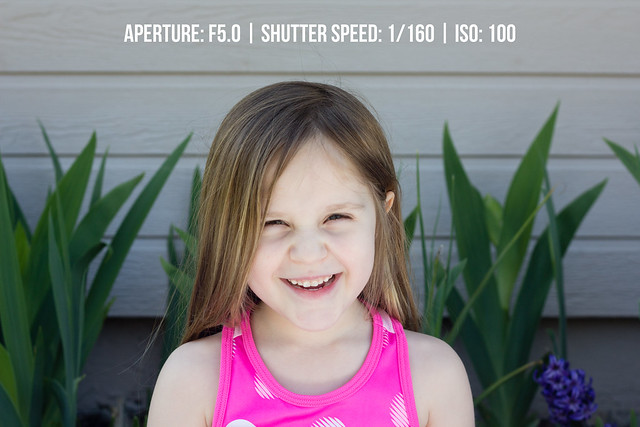
Get Them Moving! The best pictures I've taken of Owen are always when he's busy doing something he really loves, like playing with his daddy at the beach or rolling around on the floor with his cars. It's fun to see him frozen in motion and with such a genuinely happy smile. The picture on the left was taken in the automatic "sports" setting on my Canon.
50mm ISO 100 f/2.2 1/160
Use the rule of thirds to make a simple picture more interesting to look at. This picture was taken on Mother's Day this year up in San Francisco. The picture is off center with Owen and I in the right third of the photo, which makes it a bit more interesting. I also really like the bright and blurriness of the plants behind us. We were sitting in the shade, Keith (the photographer here) was in the shade too and our background was mostly sunny, which is what gives it that cool bright appearance.

50mm ISO 400 f/2 1/40 
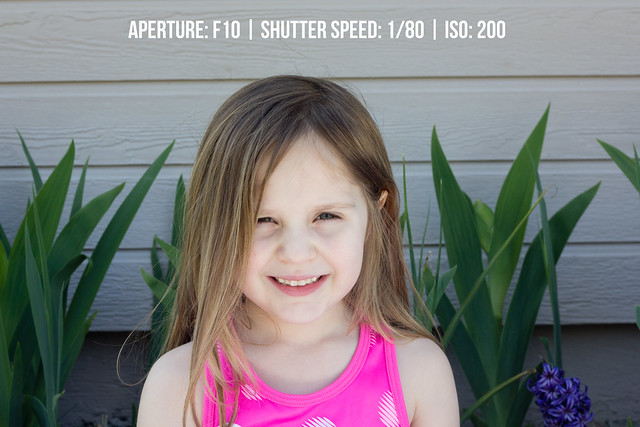
Play with props. You've probably noticed that Owen is almost always holding something in his hands in our pictures. He is just such a busy boy and needs to be doing something fun, otherwise he wants grab the camera from me. This was taken inside in the early afternoon near our very large and long kitchen windows with Owen sitting on the kitchen counter playing with an old camera of mine. He was busy having fun with my old point and shoot camera, and was stuck in one place, since I had him sitting on the counter. For this picture I had to turn the aperture and shutter speed down low to get Owen to be light enough, but he was happy to sit and play with my camera while I figured it all out.
50mm ISO 400 f3.2 1/200
Let it happen naturally. I've thought of some great places for taking pictures of Owen and when we finally get there it doesn't work the way I wanted it to. There is no fun in forcing your child to smile or sit for a photo just to get the perfect shot. I've found it's best to just have my camera with me as much as I can and to let the pictures I take be authentic and not staged (too much!)! His smile is the best and he's most happy when he's playing and having fun doing something HE wants to do, and not what I make him do. For this picture we were playing in the backyard and I was filling his pool up. He wanted to give it a try and I knew this would be a cute picture, so I ran in and grabbed my camera from the kitchen. I told him to try spraying me with the hose (luckily it was on pretty low) and that's how I captured his big smile.

Editing. For my big camera I like to use iPhoto to store my pictures and edit them. I might lighten them up a notch or two, change them to black & white or retouch something small like a blemish or wrinkle (mainly on me!), but I prefer to use them as is. If the picture  needs more work than that and I still don't like it, I just don't use it. To add graphics and letters to my pictures I use the Acorn on my Macbook Pro. It was $50 and it is great for adding extras to my pictures (mainly for blogging). It was pretty easy to learn how to use too. If I'm taking pictures on my iPhone I like using PicTapGo to add light.


I hope some of these little tips that have worked to make my pictures better will help some of you too! Thank you SO much to Sara for letting me be a part of her Photography for Moms series! I am learning so much from what everyone else has to share!


*     *     *     *     *     *     *     *     *     *     *     *     *     *     *     *     *     *     *     *     *     *     *     *    

Photography for Moms Series:
Part 1 - Finding the Light
Part 2 - Step Off and Step In
Part 3 - For the Love of Photos
Part 4 - Aperture Priority

Part 5 - Sibling Shots
Part 6 - Monthly Milestones
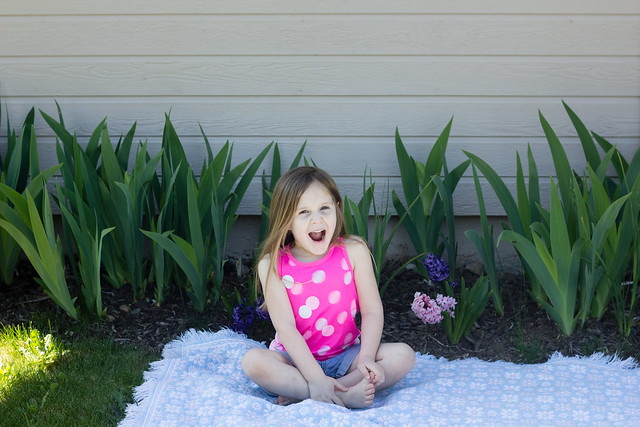


 photo sig_zps61e7e874.png

Wednesday, May 21, 2014

Photography for Moms - Monthly Milestones

I'm so excited about today's installment in the "Photography for Moms" series.  One of my favorite bloggers and new mom of two, Erin of Strawberry Swing and Other Things is here today discussing how to take those monthly milestone photos that you see everywhere.  I love this post because Erin gives so much great practical advice about how to set up the shots and choose the location, get the baby to cooperate and find the best lighting.  These are all so important in getting that consistent look month to month, or week to week.  Her tips are fantastic and she draws on her own experience of what worked and didn't work.  I'm insanely impressed with her collage of her daughter Ashlynn's week-by-week growth below.  That is dedication!  I took monthly photos of Mac during his first year, but mine turned out terribly because I didn't plan ahead, I chose a location with bad lighting, picked the wrong time of day and could never stay on schedule.  I really could have used these tips below (luckily, they're just in time for Mim!).  

So, I hope you enjoy this post and learn a lot.  This is really great for anyone expecting a baby that would like to photographically document the first year's development or anyone with a baby that would like to do this going forward (you can start at any time!).  Feel free to ask Erin any questions you have in the comment section below.  Thank you so much for this post, Erin!  One of these days I'm going to take you out for a giant margarita! 

Hi everyone!  I'm Erinn and I blog over at Strawberry Swing and other things.  I'm a mom of two girls, nineteen months apart (currently 2 years and 5 months) and am up to my eyeballs in all things baby and toddler... and diapers.  Lots of diapers.
And those coveted heart warming giggles too.

I am so incredibly flattered Sara asked me to contribute to this series.  Mostly because I wait for these posts with baited breath for all the tips and tricks I can add to my 'novice mommy photographer' arsenal.    I got my "big girl" (read: DSLR) camera on Black Friday 2011, a Canon Rebel T2i.  I was just shy of 4 months pregnant with my daughter Ashlynn and considered it my Christmas, Birthday (Jan 1st), and Halfway through Pregnancy present to myself.  I bought a 50mm (nifty fifty) f/1.8 prime lens the following summer a few months after my daughter was born.  I have never taken a photography class, only reading a handful of tutorials found via pinterest or posts like Sara has been sharing.  So no professional status here, I'm just a mom who over documents her kids - just like you!
As for my current ability, I generally shoot in Av mode, especially now with my toddler on the move.  I can never get the settings changed quickly enough and prefer to take as many pictures as I can to find a  few gems than I can edit lighting, rather than take the perfect photo...which would most likely be of the back of her head.

I did however, hone my manual shooting skills when Ashlynn was baby.  She was my first child and she didn't move.  I would play around with the camera settings, moving her room to room, and bask in the 500 pictures I would take of her that day.   I'm still far from a professional, but I learned about my camera, lighting, back button focus, ISO, and shutter speed in the process.  If anything, it was an excuse to make sure I was picking up my camera instead of waiting for holidays or special occasions.

A true "first born" child with the thick baby photo book to prove it.

When Ashlynn was born I knew I wanted to take weekly pictures of her.  I wanted to track that progress ever since watching John and Sherry of YoungHouseLove do it of their daughter Clara and Reichel of CopyCatChic of her daughter Arden.  These were my inspirations and from there I took similar weekly photos of Ashlynn laying on one of her Aden + Anais Swaddle blankets since they were the largest blankets I had and they coordinated together.  I liked having something other than a plain white background, but nothing too bright or competing since I wasn't using a white onesie like YHL.  Instead, I was putting to use the plethora of adorable clothes we received from friends and family - and of course my own habit of binge shopping.  I edited the photos using Picasa, correcting any contrast or color issues, cropping, and then adding the week number.
Of course there were lots of other inspirations on Pinterest - baby in chair or cribbaby next to a teddy bear or lovey to show physical growthbaby in front of a chalkboard wall, you name it.  I actually got really ambitious and tried to add monthly photos to our weekly ones and planned to document her from laying baby, to sitting, to standing in front of her dark blue gray nursery wall with balloons to correspond to her monthly age.
After the second month I gave up, turned out I didn't have proper light or timing.  The one space in her room where I could stage the shot had the best light from 7-9am in the morning.  As it got later, the crib would cast a shadow (left above) and there wasn't any other ample wall space for the photo to be staged elsewhere in the room.  Since I would purchase the balloons during business hours, I'd have to wait until the following morning to take the photo to get that prime light. By then, the balloons would be falling to the ground (middle above).  By the second month I was still having way too many issues and just hadn't planned it properly so I threw in the towel (right above).  It was a good effort, but lesson learned and I'm glad I already had good thing going with the weekly photos.  Not to mention we sold our house when she was 8 months old so I would have had to find a new wall to shoot in front of and there is no way 12 balloons would have fit in the space between the crib and closet.  Hindsight is 20/20.

Tip:  If pregnant, test shoot a teddy bear around the house.  Find a chair, wall, space on the floor that gets great light (how many of these photography for moms post can emphasis the use of light?  if you learn anything let it be that!) and shoot some test shots with any props you will be using while getting to know your camera in the manual setting.  A chalkboard, iPad, blocks... and I'm totally loving these new monthly printables from Caravan Shoppe.  Figure out where you'll place them in the frame and try to think ahead to when your baby isn't immobile anymore - meaning, when they might focus the whole photoshoot on grabbing anything within their reach or rolling, crawling, and walking away!

I would be lying to say was I wasn't a bit relieved when my daughter turned one and I was able to stop the weekly photo nonsense.  She was too old and too mobile to put up with it and it was becoming a chore trying to make sure we were home on Wednesday at 10am to get the best photo!  And yes, I was that obsessive about it.  I believe there were only two weeks we didn't take the picture on Wednesday morning and that was because of holidays.

Tip:  Consider when you will take the photos. Monthly vs Weekly? Are you a working mom?  It might be best to aim for taking them on the weekend instead of the day of the week your child was born.  And don't forget to consider the seasons.  The light and best time of day to shoot changed as we went from Summer to Winter and back.

Also, take in consideration the time of day and your child's moods.  It's unlikely you can plan that far advance, especially if pregnant with your first child.  But waiting until after a nap or feeding instead of squeezing it in before hand when the child is on the verge of meltdown is generally helpful.  And while a crying baby photo is always a winner in my book, it's generally not the best parenting tactic to allow your baby to cry in hunger while you fuss about white balance.

For our second year I went to the more attainable monthly shot.  We got Ashlynn an Anywhere Chair for her birthday and I decided we'd use that as the prop.  We keep it in our family (TV) room, but I would drag it in our playroom once a month for the photos.  Having the chair in a new space was enough to interest her to sit on it if I asked her to.  Of course as we drew closer to 2 years, items and toys from the playroom would distract her and they'd make their way into the photos, but I found it charming.  It wasn't until 23 months I actually had to bribe her with goldfish to sit for a picture.

Tip:  Find a distraction to keep them where you want them.  In her weekly photos as a baby, to keep her from rolling and crawling away, I'd place things in her hands. Hair bows or smaller (non-choking hazard) toys that wouldn't take away focus if visible in the shot.  If I was able to take it away after a few minutes and shoot her looking at me, score, if it not oh well.   Generally, it would at least get her to lay still for a few photos as opposed to just resisting from the start.
For my second daughter, Kenley, I decided to take advantage of the amazing light in her nursery. Placing her on the white chair, in a plain white onesie, her physical appearance is the sole focus and only factor that changes from shot to shot. Well, that and her headbands.  

Because I take her photos monthly and I'm not as great about picking up the camera every week like I was with my first born, I make sure I take plenty of shots during that time (usually after she's fed and the toddler is napping). 

I take shots from across the room capturing her small (growing) body in the chair with the curtains flanking the sides so there is room to add my text.  I also usually shoot standing in front of the window on her left side looking at me so I can catch the light in her eyes - always using my back button focus right on her eye.  After some of those close ups, I'll take a few of her in the crib.  I love having the difference perspectives and of course, expressions!  

Tip:  For photo step up, my first suggestion is a tripod!  Except I don't have or use one.  If you wanted pictures that taken from the exact same height or distance that's definitely your answer.  I just always try to crop the best I can so they are similar.   Also, if you use a step stool to stand over your child on a blanket or a zoom lens (I was unable to use my prime lens when shooting Ashlynn's weekly pics from above and used my kit lens), have everything ready to go before getting your baby situated.  Their patience is short and only gets shorter as they grow!
Back to the expressions.  I love getting shots that show my daughters' true personalities and sometimes staring at a camera and saying "cheese" doesn't elicit those gummy smiles or funny faces I love looking back on.  Ashlynn loved when I sang the ABCs when she was baby and Kenley loves Patty Cake.  And both love when I play Peek-A-Boo with the camera.   When in the toddler phase, I'd usually ask Ashlynn questions to keep her attention looking at me and getting a laugh.  Anything from asking her what does the cow say, what her feet smell like, or to try to blow bubbles like her sister.

Now, if you have a blog to share these shrines of your littles to the world that's great, but I'm sure the majority of moms (or dads too) scouring pinterest for ideas isn't just looking to take some pictures to store on their hard drive, but actually show off.  Whether it's a clothes line of 4x6s at the 1st Birthday Bash to a printed poster to hang and store as a keepsake.  I would imagine the most popular is creating a photo book.  For Ashlynn's weekly shots, I created an 8x8 Photobook through Shutterfly taking advantage of a 40% code for all the additional pages I needed.  I plan on making one for Kenley's first year, but instead of just having one photo per page flip book, I will also include each month's memories and milestones.  I'm sure there are some other great ways to pull all these images together, mini brag books for the grandparents, but use your creative freedom!

Thank you Sara for allowing me to share my growing girls' and obsessive picture taking.  I hope I was able to inspire and lend some helpful tips I've learned along the way!  Enjoy these days, these little ones grow up fast!

*      *      *      *      *      *      *      *      *      *      *      *      *      *      *      *      *      *      *

Photography for Moms Series:
Part 1 - Finding the Light
Part 2 - Step Off and Step In
Part 3 - For the Love of Photos
Part 4 - Aperture Priority

Part 5 - Sibling Shots

Thursday, May 1, 2014

Photography for Moms - Sibling Shots

I'm so excited about today's "Photography for Moms" post.  The amazing Jessica from jessicarachelorlo.com (previously MBB: My Baby Birds) is here today discussing how she takes such beautiful photos of her four gorgeous daughters (yep, FOUR) together.  I know just how hard it is to take decent shots of just one child, so I'm thrilled to get any and all advice I can on how to wrangle and photograph multiple kids together, interacting with each other.  As I get ready to introduce Mac to his little sister in a few months, I can't help but to scour Pinterest for photos of siblings together, which are quickly becoming some of my absolute favorites.  I knew "sibling photography" was a topic I wanted to cover during this series, so I'm incredibly grateful that Jessica was up for tackling it, as I think she's the perfect person for the job.  Her photos of her girls make my heart melt.  I can only imagine how grateful and appreciative they'll be of these beautiful photos when they're older.  I hope you'll also jump over and check out Jessica's blog.  She's one of the most honest bloggers out there, which I love about her.  I also love hearing her stories and seeing her gorgeous photos of her girls with Cape Cod serving as a background.  Not too shabby.  


Hello!

I'm Jessica and I blog over at jessicarachelorlo.com. I'm a 32 yr old stay-at-home mom to four daughters, including identical twins. I became interested in photography when my third daughter was born, and I now sell scenic prints of Cape Cod on the side. I like candid photos that show emotion and real interaction, especially between siblings. I started with a "fancy" point and shoot camera in 2010. I bought my first DSLR in early 2012, which was a Canon Rebel T3 with the 18-55mm kit lens. In late 2013 I upgraded to the Canon 70D, and bought the Canon 50mm 1.8 lens, and the Canon 70-200mm 2.8. Right now I'm drooling over the Canon 24-70mm lens, but my poor husband can only take so much, right?

With four children, two of them toddlers, getting shots of them together is challenging. The more people, the more opportunity for closed eyes, a blurry limb, a crooked smile, or a mid-photo shoot meltdown. Most of my children's pictures tend to be two at a time for that reason - better odds. Sometimes we want/need a great group shot though. These are my amateur tricks for getting a good photo with a large group of little ones.

Contain Them
Literally. Place them in a location that prevents them from going anywhere. Sit them on a bed, on a couch, on a wall, in a chair, in a corner. This is especially helpful with toddlers. For our Christmas card picture in 2012 I wanted a shot of all the grand kids, before my youngest was born. My sister-in-law danced around behind me like a fool for smiles, but when we tried to get shots on a grassy hill or walking along a sidewalk, the kids went rogue. I parked them on this wall and got this one immediately. (Next time I'd pull my little niece's dress over her legs, but perfection is hard to achieve with five kids)
Good Lighting
This is true with one or ten kids. I'm not a pro. I can't always tweak the settings on my camera quickly to snag a great moving shot at dusk. If I want to capture my antsy kids together, I put them outside or in a brightly lit room. Finding a bright room can be a challenge for some people, I know. We moved from North Texas where the houses have 20 ft ceilings with walls of windows, to a tiny cottage in New England. Some days I want to bulldoze through walls to let in some light.

These were all taken with my Canon Rebel T3 and 18-55mm lens, which is considered one of the worst lenses out there. Good lighting does wonders. Even in good lighting though, your camera settings matter. I shoot in either Manual or AV mode. AV is a nice graduation from Auto (the little green box) before jumping into Manual. You still have to pay attention to your exposure, but you have less settings to worry about overall.
This is a 'do as I say, not as I do' example. This was taken with my Canon 70D and the 70-200mm lens, but during the brightest part of the day. We didn't have a choice based on our schedule, but it made it impossible to get a shot without at least half of them squinting- especially the three year old.
Get the Candid Shot
I beg, demand, and bribe my kids to all look forward and smile perfectly. That rarely works. What works is choosing a time of day that the little ones are happiest in, meaning you avoid right before nap or meal time, and letting them have fun. Get them to laugh. Tell them to look at each other. Tell them to put their arms around each other, lean on each other, or hold one another. I'll say, "did Margo just tootie?!" Cue everyone looking at the baby and cracking up. Children are playful. Is there anything more wonderful than watching your babies laugh and enjoy each other? That's the moment to capture and remember.
This wasn't supposed to be a picture. It's one of my favorite of all of them though, because it's a scene I've witnessed hundreds of times. It's how they really walk somewhere together, whether we're at the grocery store or the beach. In fifteen years I'll miss this view.
Going for a candid shot is especially true with pets, which I consider siblings. Being patient, hanging out in the right lighting, and not getting involved in their interaction can get you a pretty shot of how they normally behave around your children.
Find a Good Editing Program
I recently purchase Lightroom 5, and love it. It's all I need for my scenic shots, but with the kids I use Lightroom 5 and then Picmonkey.com. I pay the $4 a month for the full editing tools, because for almost every shot with people in it I use the airbrush, teeth whiten, and eye brighten tools. It only takes a little bit, and I've been guilty of over-editing for sure, but I love soft skin and bright eyes on a baby.  Lightroom is great for sharpening, adjusting your colors, and playing with more obvious editing techniques like presets. Editing photos is all about personal preference. It has more to do with expressing how the moment felt than what it technically looked like. With the exception of the 'Before/After' photo, these were all edited using only Picmonkey.com. If your camera isn't currently set to shoot in "RAW", change it. This gives you maximum editing ability.
These editing options are especially great if you're planning on putting the picture in a room with certain decor. Sometimes bright blues don't fit in a room with more muted, warm tones. Subtle changes can really make a difference.
Coordinate, don't match
I'm the queen of not dressing my kids up. They're in random play clothes 99% of the time. When we know we're taking pictures, I still don't get fancy. I try to coordinate them. This all denim shot was good in theory, but when the dresses arrived the day before I was going to take pictures for holiday cards, I realized it was like DENIMDENIMDENIM. Next time we went to the beach for pictures, everyone wore blues and whites, but nothing identical. Also, no shirts with words on them. It dates the outfit and is a distraction.
This is a little less overwhelming, am I right? Although again, it's the brightest time of day. Squintless smiles would've made this shot better.
That's it for me. Thanks for reading!

jessicarachelo


*        *        *        *        *        *        *        *        *        *        *        *        *        *        *
Thank you so much, Jessica!  I love this post.

If you have any questions or comments for Jessica, please leave them below.  I hope you all are enjoying this series and learning a ton from all these amazing photog-mamas!  Let me know if you have a specific topic/issue you'd like us to discuss.  Happy shooting! 

Photography for Moms Series:
Part 1 - Finding the Light
Part 2 - Step Off and Step In
Part 3 - For the Love of Photos
Part 4 - Aperture Priority

Thursday, April 10, 2014

Photography for Moms - Aperture Priority

I'm so excited to bring you another installment in the "Photography for Moms" series.  Today's guest poster is the amazing Meredith, from La Buena Vida.  Meredith is another blogger I've been following for years and it's been so much fun watching her become a mom to two adorable little ladies.  Her post today covers a topic that is near and dear to my heart...shooting in Aperture Priority mode.  You guys, I confess right here and now that I'm an Av mode junkie.  I know I should be shooting in full manual (and sometimes I try), but Av mode is so easy and I love the results.  It's my jam!  It's quick and easy and comfortable, like a really expensive pair of yoga pants - fancier than normal, but still not full-on getting dressed and perfect to wear around the house.  That probably makes no sense.  

Anyway, Av mode is perfect for beginners that want to get out of auto, but aren't ready for full manual.  It's a great way to begin to understand the three elements in the exposure triangle (aperture, shutter speed and ISO), without getting overwhelmed.  When you're in Av mode, you only worry about (adjust) the aperture and your camera figures out everything else for you.  It's kinda genius, you guys.  And once you realize how changing the aperture changes your photos, everything else start to click (pardon the pun).  I'm so glad Meredith is tackling this subject today because I know you will love shooting in Aperture Priority and playing around with the results.  So, without further ado...


Hi guys! My name is Meredith. I'm a lot of things--a wife, a mom, a *total* book nerd, a wanna-be quilter, and a sometimes photographer. I occasionally blog over at La Buena Vida, but mostly can be found on Instagram as @labuenavidamere.
S-1

But back to photography, because that's why you're here! My junior year in high school, I was taking a pretty intense classload. After I registered for everything that I needed to take, my only available electives were metal shop and photography. I was zero percent interested in either of those choices, but I had no other options to round out my day, so I was stuck. Metal shop was a giant disaster. I made a toolbox. A marshmallow roaster. They were terrible. I was not happy to be there, and I don't think the teacher was any happier to have me.

I didn't expect photography to be any better...but it was. There was just something about winding my own film, taking a photo (with a COMPLETELY manual camera), developing the film while crossing my fingers that I didn't muck it up, and then finally developing the photos. While many of my classmates were trying to find ways to sneakily make out in the dark room, I was that girl who was captivated by how simply exposing a piece of paper to some light and then dunking it into a chemical bath could create something out of nothing. From then on, I was the TA for every available photography class through high school or college. One year, my parents got me all the parts necessary to set up a darkroom in my bathroom.

Needless to say, the love runs deep.
Newborns
Now, I'm usually found taking pictures of my own kids, but I also do a small amount of photography on the side, mostly newborns (because they're what I love most). I still tend to love black and white more than anything else--back to my roots, I suppose! Anyway, I hesitate to call myself a "pro"--it's a hobby, and a love for me more than anything else.
Girls-11_2 TRSunset-16 Sisters-14_2
{This last one is almost a year ago! How did that happen?! *Sobs*}

When Sara pitched the idea of the Photography for Moms series, I knew immediately that I wanted to talk to you all about Av mode (I'm a Canon user--for you Nikon users, I think you'll see "A" mode instead). See, when it comes to advice given to people just starting out in photography, the phrase that I most often hear is: "get out of auto and into manual mode".

I agree with the "get out of auto" wholeheartedly, and I absolutely agree that learning to shoot in manual mode (and thus learning about aperture, exposure, ISO, shutter speed, etc) will only help your photography. But can I tell you a secret? When I'm just hanging at home, shooting photos of my girls...I most often shoot in Av mode.

*GASP*

I kind of feel like I'm going to be kicked out of the club for telling you this, because I know that a good portion of the photography world thinks you should only shoot full manual, all the time. But I disagree, and here's why--with my two girls, we're up, we're down, we're inside, we're outside, the girls are hugging for .25 seconds flat, and if I were shooting in manual all the time, I'd miss a lot of good stuff. I just would. In that photography class I mentioned, the *only* option was shooting in full manual mode. So, I know how to do that just fine, and I can adjust in manual pretty quickly, but the truth is that I would *still* miss things that I'm just not willing to miss if I shot in full manual 100% of the time.

Indeed, I have a couple of real-life friends who are faithfully trying to learn to shoot in manual all the time...and while I think it's awesome that they're learning more about their camera, I can also tell you that I see them just *not* take a lot of photos because their settings aren't right. I hear them say, "Will you send me a picture of him blowing out the candles? My settings aren't right." I see them be disappointed in the photos that they do take because they aren't able to change settings quickly enough. And I think that's a shame. Because yes...there is value in learning how to shoot photos in full manual, but if doing so is so overwhelming that you don't take any pictures at all, then you're no better off than you were before (and I'd even argue you're worse off).

So, if you don't want to shoot in auto, but shooting in full manual is causing you to be frustrated by how much you miss or what you end up with, I would love to encourage you to give Av mode a try--it's one small, easy to learn thing that makes a BIG difference.

Now, if you're currently shooting in auto, I'll bet that a good portion of your photos come out looking something like this:

AV-7
It's in focus, yes. But no different than what you'd get with a standard point and shoot camera, and probably not what you were hoping for with a dslr, right?
AV-2
But this is a better snapshot. The focus is on Lizzy, and not all that stuff in the background. And you know what? You can do this too. SO EASILY, when you shoot in Av mode.  

When you shoot in Av mode, you are basically telling the camera "I'll set the aperture to where I want it, and then you can set everything else." In most cases, you'll set the aperture by spinning a little wheel or dial on your camera You can also set the ISO if you choose, but if you're just starting out, leave it on auto for now, and just focus on the aperture. There's tons of great information out there about aperture, but it can sometimes be more than you may want or need, so I'll just tell you this: 

Smaller Number = Lets in more light and has a blurrier background
Bigger Number = Lets in less light and has a crisper background 

This is obviously a gross over simplification of aperture, and if you're interested in photography, I absolutely encourage you to read more. But, if you just want to learn a few tricks for taking better photos of your kids, this may be all you need to know right now. Either way is okay :)

That said, one mistake that I see a lot of beginners make is to always set their aperture at the smallest number they can, assuming that they'll always prefer the more blurry background. But the truth is that there's a time and a place for every aperture under the sun. If you're shooting portraits, it's pretty common for your aperture to be set somewhere between 1.4 and 3. You want the person in focus, but you don't care so much about the background. On the other hand, when you're shooting landscapes, your aperture is set at a much higher number because you want EVERYTHING to be in focus. 
Landscape (8)

Landscape (10)

I lied. I have one more thing to tell you about aperture:

Start by setting your aperture at the number of people in the photo.

In all of the photos in my post, I was shooting with a 50mm 1.8 lens, so I could set my aperture as low as 1.8. And when I'm shooting indoors in the winter and need as much light as I can get, sometimes I do choose to set it that low. But as a general rule (and as you'll see below), I find that around 2.5 is the sweet spot for me, especially since I have 2 girls. But if you have four people in the photo (especially four quick moving kids), you'll probably want to start by setting your aperture at around 4 to make sure that everyone is in focus.

I know, this post has been looonnnngggg already, but I just wanted to end by walking you through what the same photo looks like with a variety of different apertures, because I think it's helpful to see! I took a series of photos of my daughter Lizzy, shooting in AV mode.  To give some context, it was about 2:30pm, and I set Lizzy on a blanket in the shade, near our garden bed. I sat on the ground a few feet away from her. Here's a pull-back shot (me standing up, and back a few feet):

AV-18
And then the "real" shots. As you scroll through, notice how the photo stays consistently exposed, but only the blurriness of the background changes. Pay particular attention to the flowers in the background, and how they move from blurry (at the lower apertures) to crisp (at the higher apertures). 
AV-9 AV-10 AV-11 AV-12 AV-14 AV-15 AV-16 AV-17

I would encourage/challenge all of you to try shooting exclusively in Av mode for at least a week. If you're shooting in auto right now, I think you'll be surprised at what a big difference this little thing makes. And then, once you're comfortable there, learn the other modes. Then learn how to shoot in manual. And THEN, learn how to work your camera to the best of its ability, taking advantage of modes like Av mode when it is most convenient, while also knowing how to make changes to those settings (in manual) if you need to.

Which brings me to my last point--you do not need to invest in a lot of gear and lenses in order to take great pictures of your kids. Up until last year, the *only* gear that I had was a Canon Rebel XS, my kit lens, and a Nifty Fifty (50 mm 1.8). That's entry-level stuff across the board.

You'll hear people say that the "kit lens is crap". For the most part, I disagree. Go look at the Flickr pool called "Kit Lens Losers". You will see some amazing photos. Often taken with the same equipment that YOU already have. Truly,  I am a firm believer that you should NOT invest a ton of money in lenses and camera bodies until you really understand your camera/lenses and have pushed them to all they are capable of.

If you have kids and want to take portraits of them, I would absolutely recommend a 50mm lens (1.8 or 1.4), though there is a bit of a learning curve that goes along with them. But beyond that, my advice is to learn your camera before you buy another lens, flash, or body. I am so glad that I waited to buy another lens to replace my kit lens--I'm just feeling ready to do that now, and compared to five years ago, I have a much better idea of my style when it comes to portraits (back in the days of black and white film, I mostly did landscapes), and also a much better idea of exactly what the body and lenses that I currently have can do, and thus a much better idea of what *I* need to shoot the way that I want to. Basically, there's a value to upgrading bodies and lenses, but that value won't be realized to its full potential until you have learned about what goes on behind the camera as well!

Okay, I promise I'll wrap it up now--thanks so much for having me Sara! If you have any questions about Av mode, please feel free to ask away in the comments!

*        *        *        *        *        *        *        *        *        *        *        *        *        *        *

Photography for Moms:
Part 1 - Finding the Light
Part 2 - Step Off and Step In
Part 3 - For the Love of Photos